Pages

Thursday, December 2, 2010

on these 25 days of christmas, what are you thankful for?


I am doing this thing on my facebook account, where I write each day about something that I’m thankful for, during the 25 days of Christmas.  Yesterday, day 1, I wrote about Alex…my super awesome (almost) 3 year old.  Today I was planning on writing about my 2nd angel, Miss Gabby…then I went to Safeway this morning to get Starbucks for the hubs and me, and some eggs and o.j. for breakfast for the kiddos.

Having just wasted $10 on coffee, I stood in line with my eggs, oj, and magazines (you know, cause I can’t wait another week to get my mailed ones…gotta have some reading material/workout inspiration now!  Gimmie a break, it wasn’t tabloids…it was fitness mags).  Normally standing in line doesn’t bug me, but at 7:45 am, it’s not cool.  After being rang up, she went to swipe her card to pay for her food, $68 worth of groceries.  I noticed when she pulled out the card, that it was a government issued card, a debit system for the food stamps program.  I’m actually surprised I even noticed the card, as she did a pretty good job of covering it so nobody would see.  The card was denied, and the look of embarrassment along with the outward sense of worry about how she was going to pay for groceries to feed her family just broke my heart.  As she stepped out of line to call the number listed on the card to find out what was going on, the cashier took the next customer and then me.  This whole scenario just broke my heart.  I wish I would have had my bank card with me, I would have paid for her groceries without even telling her. 

This situation has been on my heart all day long.  It has caused me to reflect on my life and the abundance of blessings that I have been given.  I thought of one year when I was in junior high school, when my family adopted a family for Christmas and took them an entire holiday meal, extra food and gifts for the 3 children and single mom.  I remember how excited I was and how important I felt to get to shop and pick out things for another girl who was my own age, and I remember how sad I was when I learned that I would not be able to go inside the house to deliver the holiday cheer because the girl went to my school.  I wasn’t sad that I missed giving the gifts, I was sad because I knew how hard it was to be a junior high kid and I had everything, and this girl was going through the same life lessons as me, but with nothing.

Then I thought of a story my mom tells, from when I was 4 or 5, when we were part of a community yard sale to get rid of some of the clothes I didn’t wear anymore.  My mom thought I was a real life Barbie, so I had a lot of clothes. This lady came by with her little girl, younger than me, and they fell in love with a jumper that we were selling.  The lady asked my mom how much it was, got her answer, thought for a second, and left.  My mom says she didn’t think much about it until that same lady came back about 40 minutes later, with a handful of small bills and lots of change.  She really wanted the jumper for her baby girl, so she had skimped out on her grocery store purchase for the week to be able to afford the outfit.  Now, I don’t remember these details…but I do remember the lady and the girl, and I do remember how my mom wouldn’t take her money AND how my mom bagged up every single thing we had for sale and gave to her.  I remember how grateful that woman was, and how excited her little girl was.  And, I remember how happy I felt.

So today, on the second day of Christmas, I am thankful for you MOM.  You have taught me so much in these 26 years we have had together.  Thank you so much for all of the life lessons you have taught me, the good AND the bad.  They have molded me into an OK person.  I hope that one day, I “grow up” to be a giver and a healer just like you. 
  

Wednesday, December 1, 2010

deck the halls!

oh, how i love december.  it is WITHOUT A DOUBT my favorite month of the year.  i have so much to be thankful for, but i always feel like my heart is just happy in december.  i think it's a combination of cooler weather, christmas lights, glittered goodies, and important celebrations that make me so happy.  in december, we will celebrate the birth of my savior, the birth of my marriage, the birth of my husband, and my birthday too!  actually, we celebrate all of those things within the final 10 days of the month.  throw new years eve in the mix too, and december = no sleep!

being a mother to my two rugrats, almost 2 and almost 3, means that this christmas is going to be super fun!  i'm hoping to get to post something fun every day this month, since it is the best month of the year.  it's exciting to explore the holidays with my kids, to teach them about opening presents, and to help them understand the importance of christmas, as much as an almost 2 and almost 3 year old can understand anyway.

i complain sometimes about the life God has chosen for me, but i am so grateful for it.  the best part of december is, i am so thankful every day.  i wake up happy, walk in to my living room and smile at the tree, appreciate the christmas smells (shout out to scentsy and gold canyon candles), and reflect on how great my life really is.  maybe my resolution for 2011 should be to live every month like december, minus the decorations because i don't think the hubs would let me keep them up year round...believe me, i try to extend the holidaze as much as possible...he snaps me into reality by the 1st.  :)

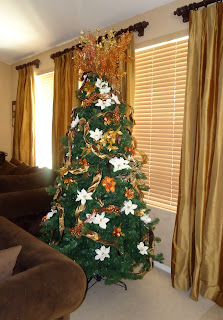
so today, here is my tree.  i threw all my decorations on it so gabby would quit tearing them up.  i didn't put the glass balls on this year though, well i did, but the count is now gabby 23, christmas balls 0.  she thinks it's hilarious to throw them and hear them shatter.  i think it's a mini heart attack every time she does it, because i do not want to play surgeon and dig glass out of baby feet!!  my friend nicole is going to be coming over soon to wave her magic wand over my tree and make it beautiful.  i'm hoping leslie (my other friend) will join her, because i think they are both fairy godmothers of christmas cheer...and my house is itchin' for some cheer!
here's the grinch side of my tree.  he lives there during december.  and look at alex, he is so concerned with the show he is watching!  i love his seriousness!

the "pretty side" of my tree...notice how the bottom is kind of bare.  that's gabby's decorating skills.
so these are the "before" of the tree, i'll be so excited to post the "after"...and maybe convince nicole to start a blog of her own!  she is craftastic!

Tuesday, November 30, 2010

tomato tower christmas tree

Okay, so I love the lighted Christmas trees that you see in all the yards this time of year.  I have some of them myself, just haven't figured out where in my yard they are going to go this year.  Thanks to my hubs and the landscaper, my tree hill is now covered with purple and white lantana...yes two colors :(  the lantana situation reeeeeaaaaaally annoys me, mostly because they should both be 1 color, not 1 of each color.  Ugh!!!
ANYWAY!!!!!  I wanted to put a lit tree on my cabinets, as part of my holiday decor.  I couldn't find any that i liked though, actually all of the ones I found had lights going up the tree in a circular motion, and all came in packs of 3 trees.  Hey holiday people, I only need ONE tree.  (totally random, but gabby spilled something on my keyboard and the shift key is sticking......not cool gabs, not cool)  OK, so the rugrats and I were at Home Depot the other day looking for inspiration...well I was looking for inspiration, they were looking for the box of donut holes I brought along to keep them quiet.  Out in the garden section, between the cacti and bougainvillas...there it was, the base for my light tree.  A tomato tower thingie.  I don't know it's real name.  I don't think it's a stake because, well, it's not a stake.  Maybe it's a cage.  I don't like things being caged though, so we're calling it a tower.  I put three of them in my cart, and was on my merry little way.
the tomato towers (this is 2 of them stacked)
I then went to Lowe's to get lights, because they were on sale for $1.98 for a 100 pack of clear lights (4.98 at HD).  2 packs for the price of 1, way to go Lowe's!  I already had bag ties at home, so I was good to go!
I used 3 packs of lights on my tree, starting at the bottom and tying the lights on in a circle around the bottom of the frame.  at the top, i pulled the 3 posts together teepee style and wrapped a tie around them.  then, i tied the lights up the length of the tower, tying them at each point they came in contact with the tower (at each circle level and the bottom)  up and down, up and down, up and down....you get the picture....till it went all the way around the tree.
2/3 of the way there...wanted you to see how it's coming together 
tied on with bag ties

after all that, I took the topper from last year's christmas tree (don't worry, i think a cowboy hat might go on top this year...cowboy tree?? i don't know yet)  then, i climbed up on the cabinet and moved some things around, climbed some greenery onto it after i placed it, and that's all!!  
turned on, for nighttime prettiness

lights off, still cool

too bad the star is crooked....i'm going to have to fix that.  i would show you the whole set up, but i've got to get some poinsettias.  


Sunday, November 7, 2010

not your normal clothes pins

I always need clothes pins to hang my workout gear when it comes out of the wash.  Workout clothes are waaaaaaaay to overpriced to have them shrink up on me, and I like my zumba pants baggy...so I don't take any chances.  Since I painted my laundry room and made it really nice to look at, I figured I should do something to the ugly clothes pins that hold my zumba clothes. I teach zumba 6 days a week, so I always have the clothes hanging in my laundry room (and by laundry room, I usually mean the pull up bar in my closet...but I promise that I will start hanging clothes to dry in the laundry room now that the laundry room is pretty)

I don't remember which blog I saw this project on, but I thought it was such a great idea!  It's really simple too, mod podging scrapbook paper to a clothes pin...instant upgrade!  I was just thinking too, since it's almost Christmas and all, that my laundry room might have to get a mini-tree this year...with clothes pin ornaments...YES!!!!

Here's what you need:
mod podge, any type
clothes pins, i bought a huge pack at walmart for around $4
scrapbook paper, i bought a big pack at walmart for $5
scissors
small paintbrush of foam applicator
a ruler
a pencil
a piece of cardboard

Here's what you do:
Measure the width and length of the clothes pin with your ruler
Make lines across the back side of your scrapbook paper that are the width of the clothes pin
Make lines down the back side of your scrapbook paper that are the length of the clothes pin
Cut along the lines
Clip the clothes pin to the cardboard, and apply a layer of mod podge to the clothes pin.  Be careful not to get mod podge on the spring, because your clothes pin won't work.
Lay a piece of your cut paper on the clothes pin, and apply another coat of mod podge on top of the paper.
Once it dries, flip the cardboard over and do the same thing to the other side.

what you need


-Amanda

weekend projects (painting cabinets)

My husband has been stalking google for the past few weeks, looking for pictures of white painted kitchen cabinets.  We have medium brown oak cabinets, you know the ones that come with the house...nice quality, not awesome color.   We have known since we moved in that we were going to redo the cabinets.  But, over the course of this past year and a half, it has gone from me re-staining to having them refaced, and now to potentially me painting them white.  not white white, but creamy white, maybe with a little distressing?  I haven't decided yet.

Because my kitchen is literally the heart of my house, being part of a very open floor plan, I have to make sure that whatever I do (or hire out) results in something that is beautiful and compliments the rest of my house.  I hate spending money on things that I don't need, like thousands on cabinet refacing.  That money could be much better spent on more important things like shoes and Coach bags!  If I am anything, it is frugal in the wrong places!!  But that's ok, because I am quite sure that a new shiny Coach bag will look awesome sitting by my diy painted cabinets!  I decided to paint my laundry cabinets and guest bathroom cabinets this weekend, as "practice" for the kitchen.  Here are some pictures of my laundry room, I just finished it this morning.
newly painted laundry cabinets...i accidentally put the door hardware on the drawers, and the drawer hardware on the doors...i think it looks good though

the other side of the laundry room, i really need to find the pedestals to go under my washer and dryer!  that's what i get for buying appliances on craigslist!  that lighter color on my wall is reflection from the light, not a bad paint job  haha!

i still have to sand and repaint the door to the garage...previous homeowners half painted it....it looks really crappy, especially now that my laundry room is so pretty!
I am such an airhead, I forgot to take "before" pictures of my laundry room.  So, I'll tell you what it looked like.  The cabinets were stained oak, the walls were a light tan color from Raplh Lauren's "river rock" collection, that shelf above my washer and dryer was deep red, and there was a builder installed basic light.  I forgot to take pictures of the new light fixture.  It's not that exciting though, so I'm not too concerned with showing you.

Here's what I did on the walls:
1. 2 coats of Killz2 primer to cover the grittiness of the river rock paint
2.  2 coats of Martha Stewart eggshell finish in Cumulus Cloud

Here's what I did on the cabinets:
1.  Light sanding to remove varnish from the cabinet doors
2.  Instead of sanding the door facing, I used Sander/Deglosser on the door facings, because I didn't want the mess of the sander in the house.  Actually, I don't even know if it is called the door facing...but that's what I'm going to call it.  It's the part of the cabinet that holds the shelves and is attached to the wall, you know what I'm talking about!  :)
3.  2 coats of Killz2 primer, sprayed on with a spray gun (I hate the spray gun, by the way)
4.  3 coats of Glidden semi-gloss in Picket Fence, with light sanding (220 grit paper) in between each coat.  I did a final light sanding with 320 grit paper after the last coat.
5.  I added hardware to the drawers and doors.

Here's what I did on the shelf:
1.  Light sanding to remove the gloss from the red enamel that was on the shelf.
2.  2 heavy coats of Killz2 primer with a paintbrush (not the stupid sprayer).  I let these coats each dry overnight, because i was covering red with white.
3.  2 heavy coats of Glidden semi-gloss in Picket Fence, to match the cabinets.

Everything I did to my laundry room was so much easier than I expected it to be, which is the reason I am sharing.  I get easily intimidated by things like putting holes in my cabinetry to install hardware...but it was a piece of cake.  Be looking for some tutorials soon, just in case you are interested!


-Amanda

Thursday, October 28, 2010

chocolate chip cookies

This recipe is completely unhealthy, full of fat, and absolutely DELICIOUS!  I know, it goes against what I should be using this blog for...but I just had to share.  With it being so close to Halloween, I have justified this by suggesting you pass these cookies out as treats, instead of packaged (full of preservatives) candy.

Here's what you need:
1 cup of butter
1 cup of white sugar
1 cup of packed brown sugar
2 eggs
1 tsp vanilla
2 cups of flour
1/2 tsp salt
1 tsp baking soda
1 tsp baking powder
2 cups of rolled oats, ground*
1 bag or 2 cups of chocolate chips (i use toll house mini semi-sweets)
1 chocolate bar (i used a big symphony milk chocolate bar)

baking sheet
parchment paper (saves time/less messy/cookies don't stick)
mixer
food processor (i use my ninja, and it rocks)
2 large mixing bowls
measuring utensils

Here's what you do:
*put your candy bar in the freezer until it's frozen
*preheat your oven to 350
1.  Cream the butter and sugar in a large bowl.  Add the eggs, one at a time, and mix well.  Add vanilla.
2.  measure 2 cups of rolled oats and put them in your food processor, process them until they become "chunky" oat flour, i have pictures below
3.  In a separate bowl, combine 2 cups of flour, the processed oats, baking soda, baking powder, and salt.
4.  Slowly add the dry mixture to the wet mixture, blending completely.
5. place your frozen candy bar into your food processor, and process it into little shavings or chunks
6.  fold in your chocolate chips and the chocolate shavings.

Here's how you bake:
Drop rounded spoonfuls of the cookie batter about an 1.5 inches apart on your parchment lined cookie sheet.  Bake for 9 minutes, but not longer.  When you pull the cookies out, they might look undercooked...but trust me, they are done.  I pull the parchment off the tray, so the cookies can cool (without continuing to bake on a hot cookie sheet).

This recipe made about 40 cookies for me.


rolled oats in the ninja
                                        

rolled oats, after the fight with the ninja...ninja won
                                        

yummy cookie batter
                                        

finished product, nothing better than warm cookies and milk

Sunday, October 24, 2010

Halloween - the Zumba way!

I love Halloween!  I am a firm believer that if every day were a costume party, the world would be a happier place!  Seriously, how can you not giggle at these pictures?!?  

So, for those of you who may not already know this, I am a fitness instructor.  I teach Zumba, cardio hip hop, and sometimes toning classes.  Below are a few pictures from my friend Lisa's Halloween Zumba party this past Friday.  Lisa and I teach at Mountainside Fitness, and she is one of the women who encouraged me to become an instructor.  

When I thought of doing this blog, I thought it would be a good place to share healthier options for yummy food, since I work in a field that promotes overall healthy living.  I'm thinking now, that it may become more of a place where I can share yummy recipes, workout tips, crafty adventures, toddler antics, etc., etc., etc.  In case you didn't already know this, I have two toddlers that run my life.  Alex is 31 months old and Gabby is 20 months old.  I'll post pictures of them sometime, so you can meet them.

Have a great Halloween week everyone!

Lisa and me at her Boo Bash


some of the Mountainside Fitness zumba crew

everyone in their Halloween costumes, ready to sweat

with Nancy from A to Zebra celebrations...she makes awesome party banners y'all!!